Every blog contains a page 'Contact Us', A contact form is the necessary element for any website to get in touch with visitors. The visitors of blog can contact the admin easily through contact form. Due to this, one must set-up a working contact form in his/her blog. No doubt, WordPress provides with a separate plugin for this purpose but blogger users may face some difficulty when they want to create a contact us page.
There are many online services which create a contact form for you. You have to make account on such websites and design your contact form manually. But it is not an official blogger contact form because every online service leave its credit in your contact form. Anyhow, we will describe here some easy ways to add contact form in a separate page.
Method#1: No Need To Edit Template Or Layout
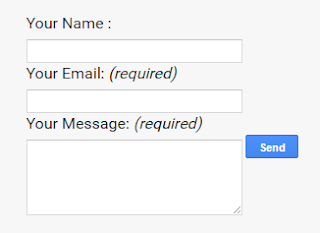
This method is the easiest and simple way to set-up a contact us page for your blogger. It will create a contact form as shown above. You just need to follow the simple steps mentioned below.
- Sign in to your blogger, choose your desired blog's page section and create a new page.

- Add page tittle first because it will be your permalink. (/contact-us.html).
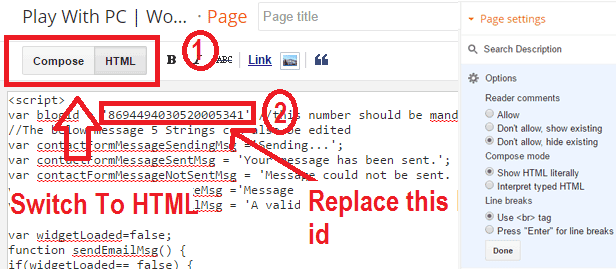
- Then switch to HTML mode and paste the following code in this page.
- Page setting should be as shown in image below.
Code For Contact Form
<script> var blogId = '8846484980614934818';//this number should be mandatorily edited. //The below message 5 Strings can also be edited var contactFormMessageSendingMsg ='Sending...'; var contactFormMessageSentMsg = 'Your message has been sent.'; var contactFormMessageNotSentMsg = 'Message could not be sent. Please try again later.'; var contactFormEmptyMessageMsg ='Message field cannot be empty.'; var contactFormInvalidEmailMsg = 'A valid email is required.' var widgetLoaded=false; function sendEmailMsg() { if(widgetLoaded== false) { _WidgetManager._RegisterWidget('_ContactFormView', new _WidgetInfo('ContactForm1', 'sidebar', null, document.getElementById('ContactForm1'), {'contactFormMessageSendingMsg': contactFormMessageSendingMsg , 'contactFormMessageSentMsg': contactFormMessageSentMsg , 'contactFormMessageNotSentMsg': contactFormMessageNotSentMsg , 'contactFormInvalidEmailMsg': contactFormInvalidEmailMsg , 'contactFormEmptyMessageMsg': contactFormEmptyMessageMsg , 'title': 'Contact Form', 'blogId': blogId, 'contactFormNameMsg': 'Name', 'contactFormEmailMsg': 'Email', 'contactFormMessageMsg': 'Message', 'contactFormSendMsg': 'Send', 'submitUrl': 'https://www.blogger.com/contact-form.do'}, 'displayModeFull')); widgetLoaded=true; document.getElementById('ContactForm1_contact-form-submit').click(); } return true; } </script> <form name='contact-form'> <div>Your Name : </div> <input class='contact-form-name' id='ContactForm1_contact-form-name' name='name' size='30' type='text' value=''/> <div>Your Email: <em>(required)</em></div> <input class='contact-form-email' id='ContactForm1_contact-form-email' name='email' size='30' type='text' value=''/> <div>Your Message: <em>(required)</em></div> <textarea class='contact-form-email-message' id='ContactForm1_contact-form-email-message' name='email-message' rows='5'></textarea> <p></p> <input class='contact-form-button contact-form-button-submit' id='ContactForm1_contact-form-submit' type='button' value='Send' onclick="sendEmailMsg()"/> <div style='text-align: center; max-width: 450px; width: 100%'> <p class='contact-form-error-message' id='ContactForm1_contact-form-error-message'></p> <p class='contact-form-success-message' id='ContactForm1_contact-form-success-message'></p> </div> </form>
- This code contains some numbers, highlighted in red. This is blog id. Replace this number with your own blog id. Here is the image to show you how to identify your blog id.

- There is no need to make any change in this code. Just publish this page and check either your contact form is working or not.
Method#2: Through Layout & Template Editing
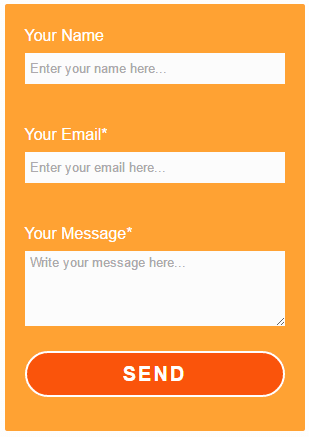
This method will create a contact form as shown above. It is a bit tricky because you need to add a working contact us widget in layout, then hide it in template. Anyway, its is not much difficult. Here is the easy and step by step guide to complete this procedure.
- Sign into your blogger account, choose desired blog, go to "Layout" and add a gadget on sidebar.
- Click "Add a Gadget", a window will appear. Here, choose "More Gadgets" and click on "Contact Form".
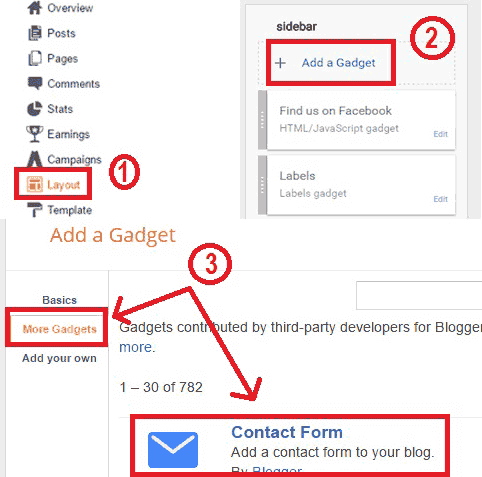
- Save this setting and check your bog. It will show a contact form in sidebar. You can check the working of this form by sending a message to yourself through it. Its working is well and good.
- Now Go to "Template" >> "Edit HTML".
- Click anywhere in coding section and press "Ctrl + F" (Mac users will press "Command + F"). A search bar will appear.
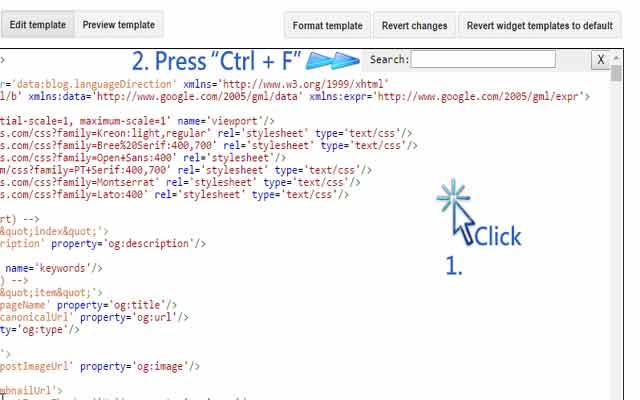
- Write ]]></b:skin> in the search bar and press enter to find it.
- Now copy the following code and paste it above ]]></b:skin> tag.
div#ContactForm1 {
display: none !important;
}
display: none !important;
}

- Click on "Save Template", reload your web page. You can see that the contact form will not show any more on the sidebar of your blog.
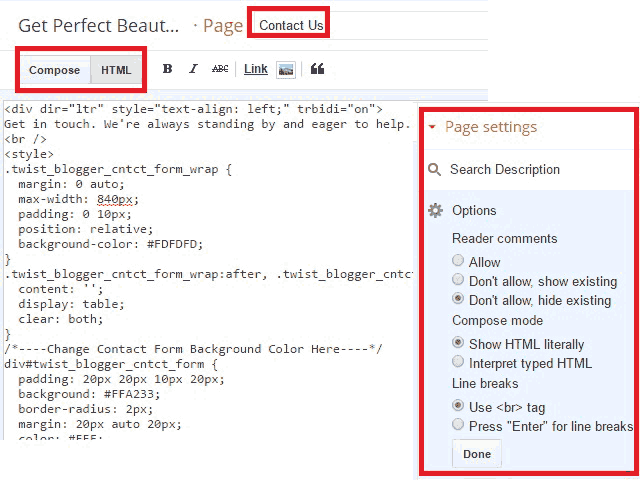
- Go to "Pages" and create "New Page". Give a tittle to it e.g Contact Us.
- Switch to HTML, delete any lines which are already written and paste the following code here. Page setting should be as shown in image below.
Contact Form Code
<div dir="ltr" style="text-align: left;" trbidi="on">
Here write something. It will be shown with the form. You can also delete this line.
<br />
<style>
.twist_blogger_cntct_form_wrap {
margin: 0 auto;
max-width: 840px;
padding: 0 10px;
position: relative;
background-color: #FDFDFD;
}
.twist_blogger_cntct_form_wrap:after, .twist_blogger_cntct_form_wrap:before {
content: '';
display: table;
clear: both;
}
/*----It is all about contact form background color----*/
div#twist_blogger_cntct_form {
padding: 20px 20px 10px 20px;
background: #FA540B;
border-radius: 2px;
margin: 20px auto 20px;
color: #FFF;
font-size: 16px;
max-width: 260px;
}
input#ContactForm1_contact-form-name, .contact-form-email, .contact-form-email:hover, .contact-form-email:active, .contact-form-email-message, .contact-form-email-message:active, .contact-form-email-message:hover {
padding: 5px;
box-shadow: none!Important;
min-width: 186px;
max-width: 260px;
width: 100%;
border: 0 !important;
line-height: 1em;
min-height: 31px;
background: #FCFCFC;
margin-bottom: 15px;
}
/**** Submit button ****/
.contact-form-button-submit {
background: #FA540B;
font-size: 20px;
letter-spacing: 2px;
cursor: pointer;
outline: none!important;
color: #FFFFFF;
border: 2px solid rgba(255,255,255,1);
border-radius: 50px;
min-width: 186px;
max-width: 260px;
width: 100%;
text-transform: uppercase;
height: 46px;
margin-top: 10px!important;
transition: all 300ms ease-;
-webkit-transition: all 300ms ease-in-out;
-moz-transition: all 300ms ease-in-out;
}
/**** Submit button on mouse hover ****/
.contact-form-button-submit:hover {
border: 2px solid;
color: #FFFFFF;
background: #EF4800 !important;
}
/**** Submit button on Focus ****/
.contact-form-button-submit:focus, .contact-form-button-submit.focus {
border-color: #FFFFFF;
box-shadow: none !important;
}
/**** Error message and Success Message ****/
.contact-form-error-message-with-border .contact-form-success-message {
background: #f9edbe;
border: 1px solid #f0c36d;
bottom: 0;
box-shadow: 0 2px 4px rgba(0,0,0,.2);
color: #666;
font-size: 12px;
font-weight: bold;
padding-bottom: 10px;
line-height: 19px;
margin-left: 0;
opacity: 1;
position: static;
text-align: center;
}
</style>
<br />
<br />
<div class="twist_blogger_cntct_form_wrap">
<div id="twist_blogger_cntct_form">
<form name="contact-form">
Your Name<br />
<input class="contact-form-name" id="ContactForm1_contact-form-name" name="name" placeholder="Enter your name here..." size="30" type="text" value="" /><br />
<br />
Your Email*<br />
<input class="contact-form-email" id="ContactForm1_contact-form-email" name="email" placeholder="Enter your email here..." size="30" type="text" value="" /><br />
<br />
Your Message*<br />
<textarea class="contact-form-email-message" cols="25" id="ContactForm1_contact-form-email-message" name="email-message" placeholder="Write your message here..." rows="5"></textarea><br />
<input class="contact-form-button contact-form-button-submit" id="ContactForm1_contact-form-submit" type="button" value="Send" /><br />
<div style="max-width: 260px; text-align: center; width: 100%;">
<div class="contact-form-error-message" id="ContactForm1_contact-form-error-message">
</div>
<div class="contact-form-success-message" id="ContactForm1_contact-form-success-message">
</div>
</div>
</form>
<br />
</div>
</div>
</div>
- There are two red-highlighted lines in the above code. The first line is a optional, you can edit it or delete it. The second is a color code for form background. You can change this code according to your own will. (Get color codes from this website.)
- There is no need to make any other changes in code. So, simply click on publish and see the results. Here, you will find the awesome working contact form.
Bottom Line
You have done a good job and made your desired contact from. Now your visitors can contact you easily through this form. Leave a comment below to give your valued feedback or ask a question in case of any confusion.


thanks for the article. just got many easy ways to add contact form in a separate page!
ReplyDeletejson formatter