Email subscription box is the best way to get your users remain in contact with your blog through their email. Any user can easily follow by email to get each latest post directly in their inbox. Blogger also gives the facility of default subscription box which can be added easily on a single click. But the default box is not much stylish and beautiful. Due to this reason, many bloggers search for custom stylish subscription box for their blog.
Here, we will discuss about a subscription box which is beautifully designed with CSS. Therefore, we need to add some CSS in our source code to make the box fully functioned. Following is the complete step by step guide to achieve this goal. This tutorial depends on three steps.
- Adding CSS in source code
- Adding Subscription Box Gadget in Sidebar
- Customizing the Box
Step 1: Adding CSS in Source Code
First of all, we should add a specific piece of CSS in our source code.
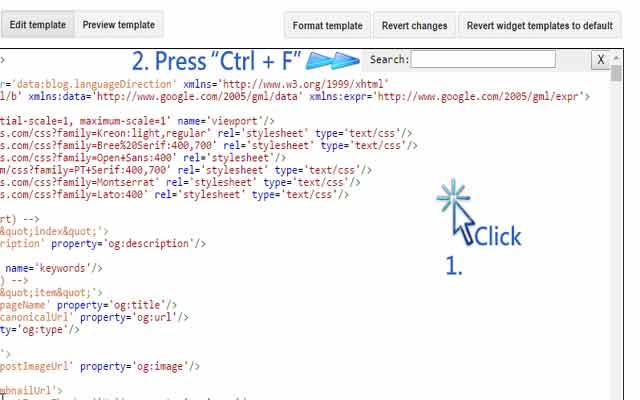
- Go to "Template" >> "Edit HTML".
- Click anywhere in coding section and press "Ctrl + F" (Mac users will press "Command + F"). A search bar will appear.

- Write ]]></b:skin> in the search bar and press enter to find it.
- Now copy the following code and paste it above ]]></b:skin> tag.
#blog-ornate-subscribe { background: #55A2F4; padding: 26px; }
#blog-ornate-subscribe h4.title { color: #FFFFFF; font-size: 22px; text-align: center; line-height: 1; margin-bottom: 0; text-transform: uppercase; margin-top:10px; }
#blog-ornate-subscribe p { color: #FFFFFF; margin: 0; text-align: center; }
#blog-ornate-subscribe p.text { opacity: 0.8; margin: 15px 0; }
#blog-ornate-subscribe input { width: 100%; margin: 0; border: none; box-sizing: border-box; box-shadow: none; text-align: center; padding: 10px 0; height: 45px; border-radius: 0; }
#blog-ornate-subscribe input.email-field {
background: #F1F1F1 url(https://lh3.googleusercontent.com/-d1XyMp54VhY/VvbxrdJZMXI/AAAAAAAACdw/q1jYbqfci6sVQxs0JzDPUfobbT00bH2_gCCo/s16-Ic42/email.png) no-repeat;
background-position: 5px 14px !important;
padding: 10px;
border: 1px solid #CCC;
-moz-border-radius: 5px;
-webkit-border-radius: 5px;
border-radius: 5px;
-moz-box-shadow: 0 1px 1px #ccc inset, 0 1px 0 #fff;
-webkit-box-shadow: 0 1px 1px #CCC inset, 0 1px 0 #FFF;
box-shadow: 0 1px 1px #CCC inset, 0 1px 0 #FFF;
}
#blog-ornate-subscribe input:focus{
background-color: #FFF;
border-color: #E8C291;
outline: none;
-moz-box-shadow: 0 0 0 1px #e8c291 inset;
-webkit-box-shadow: 0 0 0 1px #E8C291 inset;
box-shadow: 0 0 0 1px #E8C291 inset;
}
#blog-ornate-subscribe input:focus::-webkit-input-placeholder { color: transparent !important }
#blog-ornate-subscribe input:focus::-moz-input-placeholder { color: transparent !important }
#blog-ornate-subscribe input:focus:-moz-input-placeholder { color: transparent !important }
#blog-ornate-subscribe input.submit { font-weight: 500; font-size: 18px; background: #FFFFFF; margin-top: 20px; text-transform: uppercase; color: #55A2F4; box-shadow: 0px 1px 2px 0px rgba(0, 0, 0, 0.05); cursor: pointer;
border: 1px solid #CCC;
-moz-border-radius: 5px;
-webkit-border-radius: 5px;
border-radius: 5px;
-webkit-transition: all .3s ease-in-out; -moz-transition: all .3s ease-in-out; -ms-transition: all .3s ease-in-out; -o-transition: all .3s ease-in-out; transition: all .3s ease-in-out;
}
#blog-ornate-subscribe input.submit:hover{background:#f03636;color:#fff;}
Step 2: Adding Subscription Box Gadget In Sidebar
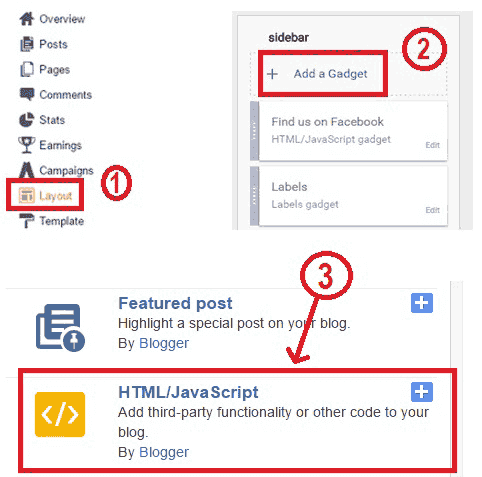
- Now go to your "Layout" >> click on "Add a Gadget" in Sidebar.
- A pop up window will open. Here, click on HTML/Java Script.
- Copy the following code and paste it into this gadget.

<div id="blog-ornate-subscribe">
<h4 class="title">Subscribe via Email</h4>
<p class="text">Don't Miss Any Updates, Stay Connected!</p>
<form action="https://feedburner.google.com/fb/a/mailverify" method="post"
target="popupwindow" onsubmit="window.open
('https://feedburner.google.com/fb/a/mailverify?uri=PlaywithPC', 'popupwindow', 'scrollbars=yes,width=550,height=520');return true">
<input class="email-field" name="email"
placeholder="Enter email address" type="text" />
<input type="hidden" value="PlaywithPC" name="uri"/>
<input type="hidden" name="loc" value="en_US"/>
<input class="submit" value="Sign Up Now" type="submit" /> </form> </div>
Step 3: Customizing Box According To Our Own Desire
You have added a working email subscription box in our blog. This box should be similar to the below image.

Now you need to make some changes to make it work for you. Below mentioned values can be changed accordingly.
- First CSS code contains #55A2F4 two times highlighted in yellow. This code is for the background color of box. You can change it according to your own desire.
- This first CSS code has #f03636 highlighted in green color. This code is for button hover color. (You can find HTML color scheme from this website.)
- Second code that we have added in layout gadget, contains 'PlaywithPC' two times. Replace this name with your feed-burner id/name.
Bottom line
Well, you have successfully added CSS stylish subscription box in your blog. Now you and your visitors will able to see and use this box to follow your blog to get each update directly in the inbox through email. Comment below to give your valued feedback or ask a question in case of any confusion.


No comments:
Post a Comment