There are lot of bloggers which prefer to convert their blogger blog into a professional website by getting a top-level domain to remove blogspot from their blog's URL address. No doubt, a custom top-level domain is necessary for bloggers that want to earn from Google Adsense through their blog because now it is required to set a top-level domain before applying for Adsense.
First of all I should clear the concept of custom top-level domain. Basically, a blog is created with the address bar that looks like www.example.blogspot.com which is a sub-domain. The presence of blogspot indicates that this website/blog is created by blogger with a free sub-domain. On the other hand, a custom top-level domain will look as www.example.com. Now you can clearly see the difference between a sub-domain and top-level domain.
>> Free sub-domain= www.example.blogspot.com
>> Custom Top-Level Domain= www.example.com
Step by Step Guide To Set Custom GoDaddy Domain
- Login to your blogger dashboard and go to Settings >> Basic Settings
- In the Publishing section, click on "+ Set up third-party URL for your blog".

- Add complete address (www.example.com) of your domain.
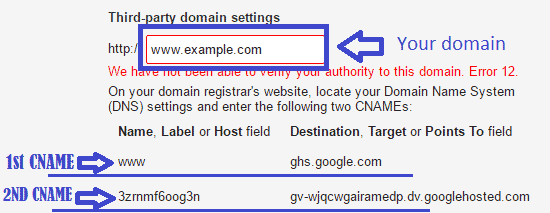
- It will give an error message when you try to add this domain by clicking save button.
- This error message will contain two CNAME records. Each record consists of two fields, one is Name, Label or Host field and second is Destination, Target or Points to field. These records should be added to your GoDaddy account for completion of the process.

- Now login to your GoDaddy account with which you have purchased a custom domain.
- Go to your domain section and click on "Manage DNS".

- A CNAME record is already added with Host "www". You need to edit this CNAME record and change its Points to section. Copy the ghs.google.com and paste it into your DNS settings. Remember first CNAME record is same for all blogs. It should look like the below image.

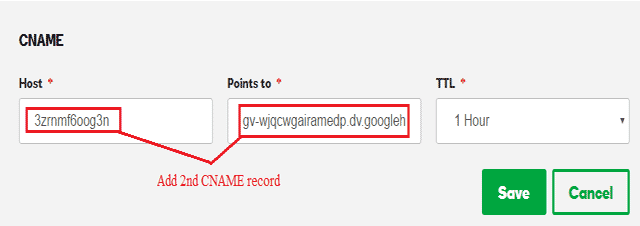
- Now add second CNAME record by clicking "ADD" button available at the bottom of "Records" section. Copy each record from blogger account and paste here. It should look like below image.

- After saving both CNAME records, go to your blogger account and click on "Save" button. Now it should not give any error. These settings can take 2-60 minutes depending upon the speed of server. In mine case it took only 1 minute.
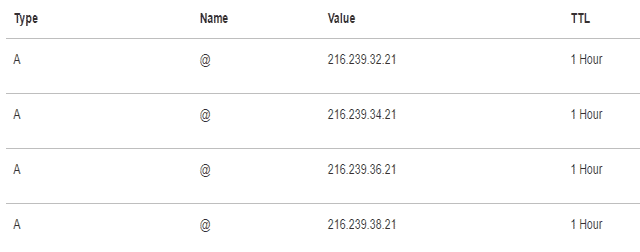
- You should also add four A records to link your naked domain (example.com) to the actual site which is www.example.com. Just click on "ADD" button, select A. Add "@" in the Host field and add following four addresses in Points to field for all four A records.
>> 216.239.32.21
>> 216.239.34.21
>> 216.239.36.21
>> 216.239.38.21
Duration will be 1 hour for all TTL fields in A records and CNAME records. These records should look like below image.

In addition, click on "Edit" on domain name in blogger account and mark the redirect option to avoid user's bad experience for your website.

Now your website should open with new custom domain. This thing is also explained by Google team to make it clear and easy for every new blogger. You can also find this article by clicking here.
Bottom Line
Again I will say that it is a good idea to get new custom domain for your blogger blog to remove blogspot form address bar to make it more attractive and professional. I hope this article will help. Post your comment below to give valued feedback or ask a question in case of any confusion.


No comments:
Post a Comment