Email subscription box will give the users to subscribe your blog to get every latest post directly in their inbox. I already posted an article on how to add email subscription box in sidebar. No doubt, blogger has its own default widget for this purpose but that widget is much simple and doesn't look better. Therefore, all the bloggers prefer to add a CSS stylish subscription box in side bar and below posts.
There are strong chances to increase the number of subscribers or followers for your blog if you have subscription box below each post. You can agree a user to subscribe by writing an attractive and meaningful article. If someone likes your post, he/she will immediately follow your blog through subscription box present right below that post. You just need to follow the below mentioned steps.
Step 1: Adding CSS in Source Code
First of all, we should add a specific piece of CSS in our source code.
- Go to "Template" >> "Edit HTML".
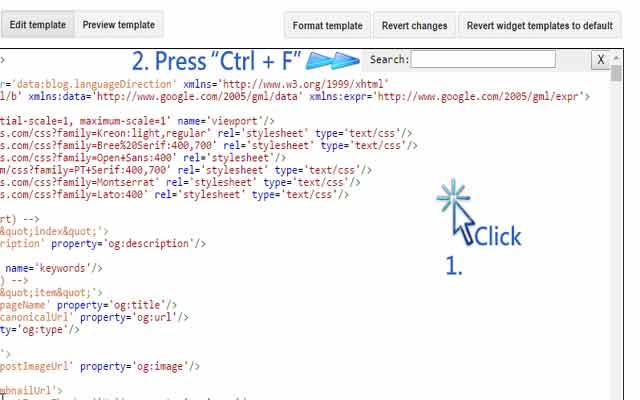
- Click anywhere in coding section and press "Ctrl + F" (Mac users will press "Command + F"). A search bar will appear.

- Write ]]></b:skin> in the search bar and press enter to find it.
- Now copy the following code and paste it above ]]></b:skin> tag.
#blog-ornate-subscribe { background: #55A2F4; padding: 26px; }
#blog-ornate-subscribe h4.title { color: #FFFFFF; font-size: 22px; text-align: center; line-height: 1; margin-bottom: 0; text-transform: uppercase; margin-top:10px; }
#blog-ornate-subscribe p { color: #FFFFFF; margin: 0; text-align: center; }
#blog-ornate-subscribe p.text { opacity: 0.8; margin: 15px 0; }
#blog-ornate-subscribe input { width: 100%; margin: 0; border: none; box-sizing: border-box; box-shadow: none; text-align: center; padding: 10px 0; height: 45px; border-radius: 0; }
#blog-ornate-subscribe input.email-field {
background: #F1F1F1 url(https://lh3.googleusercontent.com/-d1XyMp54VhY/VvbxrdJZMXI/AAAAAAAACdw/q1jYbqfci6sVQxs0JzDPUfobbT00bH2_gCCo/s16-Ic42/email.png) no-repeat;
background-position: 5px 14px !important;
padding: 10px;
border: 1px solid #CCC;
-moz-border-radius: 5px;
-webkit-border-radius: 5px;
border-radius: 5px;
-moz-box-shadow: 0 1px 1px #ccc inset, 0 1px 0 #fff;
-webkit-box-shadow: 0 1px 1px #CCC inset, 0 1px 0 #FFF;
box-shadow: 0 1px 1px #CCC inset, 0 1px 0 #FFF;
}
#blog-ornate-subscribe input:focus{
background-color: #FFF;
border-color: #E8C291;
outline: none;
-moz-box-shadow: 0 0 0 1px #e8c291 inset;
-webkit-box-shadow: 0 0 0 1px #E8C291 inset;
box-shadow: 0 0 0 1px #E8C291 inset;
}
#blog-ornate-subscribe input:focus::-webkit-input-placeholder { color: transparent !important }
#blog-ornate-subscribe input:focus::-moz-input-placeholder { color: transparent !important }
#blog-ornate-subscribe input:focus:-moz-input-placeholder { color: transparent !important }
#blog-ornate-subscribe input.submit { font-weight: 500; font-size: 18px; background: #FFFFFF; margin-top: 20px; text-transform: uppercase; color: #55A2F4; box-shadow: 0px 1px 2px 0px rgba(0, 0, 0, 0.05); cursor: pointer;
border: 1px solid #CCC;
-moz-border-radius: 5px;
-webkit-border-radius: 5px;
border-radius: 5px;
-webkit-transition: all .3s ease-in-out; -moz-transition: all .3s ease-in-out; -ms-transition: all .3s ease-in-out; -o-transition: all .3s ease-in-out; transition: all .3s ease-in-out;
}
#blog-ornate-subscribe input.submit:hover{background:#f03636;color:#fff;}
Note: If you have read previous post on adding subscription box in sidebar and already added above CSS code in your template then you do not need to add it again.
This code will create a subscription box as show in below image.

You can change the color of this box by making the following changes.
- This CSS code contains #55A2F4 two times highlighted in yellow. This code is for the background color of box. You can change it according to your own desire.
- This CSS code has #f03636 highlighted in green color. This code is for button hover color. (You can find HTML color scheme from this website.)
Step 2: Adding HTML in Source Code
Now we need to add HTML code in template for the working of our box. working.
- Go to "Template" >> "Edit HTML".
- Click anywhere in coding section and press "Ctrl + F" (Mac users will press "Command + F"). A search bar will appear.

- Write <div class='post-footer-line post-footer-line-3'> in the search bar and press enter to find it.
- Now copy the following code and paste it above <div class='post-footer-line post-footer-line-3'>.
HTML Code:
<b:if cond='data:blog.pageType == "item"'> <div id="blog-ornate-subscribe"> <h4 class="title">Subscribe via Email</h4> <p class="text">Don't Miss Any Updates, Stay Connected!</p> <form action="https://feedburner.google.com/fb/a/mailverify" method="post" target="popupwindow" onsubmit="window.open('https://feedburner.google.com/fb/a/mailverify?uri=PlayWithPcWorldOfComputer', 'popupwindow', 'scrollbars=yes,width=550,height=520');return true"> <input class="email-field" name="email" placeholder="Enter email address" type="text" /> <input type="hidden" value="PlayWithPcWorldOfComputer" name="uri"/> <input type="hidden" name="loc" value="en_US"/> <input class="submit" value="Sign Up Now" type="submit" /> </form> </div> </b:if>
Replace PlayWithPcWorldOfComputer with the name/ID of your feed burner. Otherwise people will subscribe to my website through your blog's subscription box.

Bottom Line
Now all the users of your website will see this beautiful email subscription box below each post. This thing will increase the number of your blog's followers. Comment below to give your valued feedback or ask a question in case of any confusion.


No comments:
Post a Comment